Serve Images for NextJS Site from ImageKit.io
In this post, we will create a simple NextJS site and create a masonry image gallery serving images from ImageKit.io CDN.
Prerequisite
Create a free account on imagekit.io and create a folder under "Media Gallery" and upload a few images
Under "Developer Options" menu, note down the "URL Endpoint", "Public Key" and "Private Key"
NextJS Boilerplate App
I am using Yarn to create NextJS app. You can use NPM too.
- Create a NextJS app using below command and then navigate into the app directory. My app name is "imagekitdemo"
yarn create next-app

cd imagekitdemo- Install these packages (only optional to create a masonry gallery layout using TailwindCSS)
yarn add tailwindcss postcss autoprefixer- If you choose to use TailwindCSS, then run below command to create TailwindCSS config file
yarn tailwindcss init -pNote that while creating NextJS app, if you did not choose to use "src/" folder, then most porbably all your pages are under "pages/" directory. Refer to the GitHub Repo for details.
If that is the case, then change the code in tailwind.config.js to as below
This is ensure that while purging the CSS files that is generated during build, usage of TailwindCSS classes in files under /pages/ folder is considered.
/** @type {import('tailwindcss').Config} */
module.exports = {
  content: ["./pages/**/*.{js,jsx,ts,tsx}"],
  theme: {
    extend: {},
  },
  plugins: [],
};
Open index.js file in your code editor and remove everything under
<main>tag. With this, if you run the commandyarn devyou will get a black screen when you open the pagelocalhost:3000or whichever the port your app is running onYou may open a new terminal or stop the app for the time being
Images from ImageKit.io
There are two ways you can include images form ImageKit.io on your page at this point.
If you knwo the absolute or relative URLs of the images you want to include, then you can use the ImageKit.io React component
<IKImage />If you want to dynamically fetch the all/some images based on some criteria such as below ones, then you can you use their REST API to fetch the image file names and then render them using SSG or ISG
all images form a folder
all images by a tag
Using <IKImage />
- This is the simplest way. Install the package
imagekitio-react
yarn add imagekitio-reactWithin index.js, within the main tag, use the <IKImage /> something like below to display the image
Do not forget to import the component <IKImage />
<IKImage
  urlEndpoint={urlEndpoint}
  path="/<imagekitfolder>/anga2.jpg"
  width="90%"
  lqip={{ active: true, quality: 10 }}
  loading="lazy"
  style={{
    borderRadius: "5px",
  }}
/>
Note that
urlEndpointis the ImageKit URL Endpoint you copied from "Developer Options" on ImageKit.io dashboard<imagekitfolder> is the folder name in "Media Library" on ImageKit. In case you do not have a folder, then provide the relative URL of the image
With this, image would be rendered on the page. There are many other options you can use while rendering image with this method. Refer to their API documentation here.
Using REST API
There are cases where you may have different pages on your NextJS site and you want to display a gallery of images for each - with different set of images. To keep it dynamic, you can keep the folder name on ImageKit.io media library same as page's slug or page id etc.
This way, for each page, when the route is matched, you will get the corresponding slug or id and then you can query the respective images using their REST API.
To achieve this,
- install their REST API SDK
yarn add imagekitIn our case, we will render all images from a specific gallery within the index.js file
Import "ImageKit" module into index.js
import ImageKit from "imagekit";Query Images from ImageKit.io
ImageKit module provides a method listFiles which you can use to search for image files. Let's define a function at the top of index.js to featch images. I have wrapped it around a Promise.
const getImages = () => {
  return new Promise((resolve, reject) => {
    // API initialization
    const imgkit = new ImageKit({
      publicKey: process.env.IMAGEKIT_PUBLIC_KEY,
      privateKey: process.env.IMAGEKIT_PRIVATE_KEY,
      urlEndpoint: process.env.IMAGEKIT_ENDPOINT,
    });

    // Search for Images in a "specific" Folder
    console.log("fetching images.... ");

    imgkit.listFiles(
      {
        path: "beaches",
        limit: 9,
      },
      function (error, result) {
        if (error) {
          console.error(error);
          reject(error);
        } else {
          // console.log(result)
          resolve(result);
        }
      }
    );
  });
};
Create .env.local and add 3 environment variables there. "DO NOT" direclty add private key into any JS files though they are rendered on server side and client does not get to know these.
This is because, if you are pushing the code to GitHub, then your Private Key is as good as public.
.env.local file is ignored by .gitignore by default
3 Environment variables are:
IMAGEKIT_ENDPOINT
IMAGEKIT_PUBLIC_KEY
IMAGEKIT_PRIVATE_KEY
getStaticProps
Define function getStaticProps, call the function getImages to query images from ImageKit.io and then return only the required properties. In our case, url would be sufficient. We may also take thumbnail URL if we need it.
Do not forget to "export" getStaticProps
export const getStaticProps = async (context) => {
  console.log("Getting images...");
  const images = await getImages();

  return {
    props: {
      images: images.map((image) => ({
        url: image.url,
        thumbnail: image.thumbnail,
      })),
    },
  };
};
Pass images parameter to Home component. This is provided by getStaticProps as props.
Within the <main>...</main>, add <ImageGalleryMasonry /> as shown below and pass the images props.
We will create this component in a while.
export default function Home(images) {
  return (
    <>
      <Head>
        <title>Create Next App</title>
        <meta name="description" content="Generated by create next app" />
        <meta name="viewport" content="width=device-width, initial-scale=1" />
        <link rel="icon" href="/favicon.ico" />
      </Head>
      <main className={styles.main}>
        <ImageGalleryMasonry {...images} />
      </main>
    </>
  );
}
Masonry Gallery
Create component within the same index.js file. This is a simple example. You would normally want to create a components folder and then create a component under that and export it for reuse.
For our case, it is enough to create the component locally within index.js.
Masonry layout idea is taken straight from TailwindCSS Layout examples.
Within this component, we expect images parameter as an array of image objects with 2 properties - url and thumbnail which was returned by getStaticProps.
We will simply loop through that and render the images. I have added a little animation as mouse hover effect here.
const ImageGalleryMasonry = ({ images }) => {
  return (
    <div className="columns-1 md:columns-3 gap-8">
      {images.map((image, index) => {
        const aspectRatio = index % 2 == 0 ? " aspect-[4/2]" : " aspect-[3/4]";
        return (
          <img
            src={image.url}
            className={
              "mb-8 w-full rounded-lg object-cover trasnition ease-in-out delay-150 hover:scale-150 duration-300" +
              aspectRatio
            }
          />
        );
      })}
    </div>
  );
};
Configure remote patterns
One last thing. Since we are fetching the images from a different origin than that of our own, we need to configure that imagekit.io host in next.config.js file under remotePatterns
/** @type {import('next').NextConfig} */
const nextConfig = {
  reactStrictMode: true,
  images: {
    remotePatterns: [
      {
        protocol: "https",
        hostname: "ik.imagekit.io",
      },
    ],
  },
};

module.exports = nextConfig;
With this, we are done. Start the app with yarn dev OR yarn build and yarn start and navigate to localhost:3000 or whichever shown in your terminal
You will be greeted with a beautiful masonry layout!
<figure>
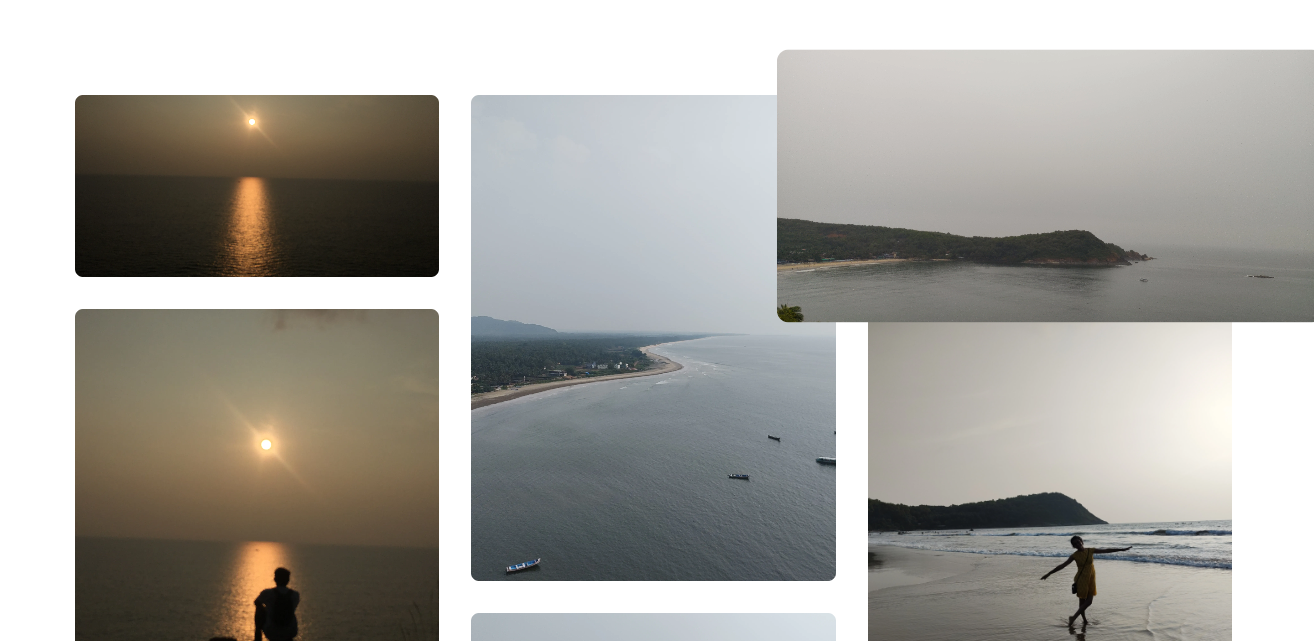
<figcaption>
masonry layout with top-right image hovered
</figcaption>

</figure>
GitHub Repo - https://github.com/dhananjayhegde/nextjs-imagekit-demo
Let me know in the comment if you liked this post and if you added any improvements to this.